
There’s no doubt about it – an excess of raw footage can be daunting. Since the advent of video and file based formats, the shooting ratio has risen exponentially. In my own experience, it is not uncommon to receive up to five hours of footage for a final product that may be under three minutes. I personally need to know that I have watched every single minute, so that there is no possibility that a hidden gem has escaped me. So what is the best way to go about it? First of all – organization is paramount. You do not want to be returning to the original rushes to find a shot. Multiple sequences are your friend. Clearly labeled sequences are your best friend. Start from the top and work down, gradually slashing as you go. Let’s do this step by step.
1. Start with a sequence called Project_Name_ALL_RUSHES. Put down every single piece of footage that was shot, end to end. This way you can get a definitive duration of how much footage was shot.


End to end, all the rushes for this project come in at 5 hours
2. Duplicate the sequence Project_Name_ALL_RUSHES several times and rename them: Project_Name_All_Interviews, Project_Name_All_Overlay. You can tailor-make this to the types of projects you work on. For example, if you were editing a music video you might want Project_Name_All_Live_Footage, Project_Name_All_Studio etc. This stage is about breaking the footage down into natural segments so it is easy to target exactly what you are looking for. Cut down each sequence so it only contains exactly what the label describes. In Project_Name_All_Interviews, only keep interviews. In Project_Name_All_Overlay, only keep overlay.

3. Duplicate these sequences again. Now rename them Project_Name_All_Interviews_SELECTS and Project_Name_All_Overlay_SELECTS. Now organize your sequences in bins. Let’s keep this project beautifully organized. Put your ALL sequences into one bin (perhaps call it Raw or WIP, or whatever works for you. You may never need to revisit these sequences again for the entire project. They are just there as a record of what footage you started with. If you ever lose a shot, or a there is some dispute over whether a particular shot even exists, these sequences can be quickly scrubbed through to locate it. It is much easier than opening up individual clips in bins). Keep your SELECTS sequences in another bin. These are the sequences that you will return to when you only want to see the “Best Of’ and not everything that was shot.

4. Start the first pass of selecting. Generally with interviews, my first pass will just be cutting out the interviewers questions and any unfinished or unusable answers. Along the way, if something stands out as really good and worth coming back to, I will raise that clip to the next video level as a visual reminder that this is worth a second look. Raising a clip to the third layer means that I am almost certain that I will use that in my final edit it’s that good. I have worked with some editors who only like to raise up their selects and keep all the unusable stuff on the timeline still. I don’t go in for this approach. I’m all about the slash and burn. We are trying to get our ratio down, the more that can be culled, the better. If you know it will never end up in the edit – just delete it. (Remember, it’s not like you’ll never be able to find it again. To find out what is missing from the head or tail of a clip, you only need to load it back into your source monitor).
5. The next step is very project specific and will be different for each type of job you are working on. For this example, let’s pretend that we are working on a documentary-style piece that has multiple interviews where the interviewees were all asked the same set of questions. The final edit will contain a range of answers from different people that communicates the story. To make your job easier as an editor, it would be best to have all of the answers collated together. So now duplicate your Project_Name_All_Interviews_SELECTS sequence and rename it Project_Name_All_Interviews_Questions_Collated. (Remember that I am only giving examples of how things could be named. It has work for you and be logical). Now I start rearranging all of my clips on the timeline and use Titles to label what each question is. Another tip is to make each title about a minute long, or longer. That way when you are looking at a very busy and full sequence, these titles act as visual markers so you can quickly identify where a new question starts. Examples may be “Name and Position” (collate all of the interviewees introducing themselves). “Who Inspires You Most” (collate all of the interviewees answering this question or whatever the question may be). Keep doing this until you have all of your interviews organized. When organizing overlay, you can make a choice as to how specific you would like to be. In general, I just visually organize my overlay into environments and set-ups and leave large gaps between the groups so I can quickly see where they begin and end. Because overlay is all about the visual, I don’t find I need titles. Whereas with interview footage, a good descriptive title will save you needing to listen to any of the answers to find the section you need.

The pink clips are the titles which briefly describe the category of selects. Even when the sequence is zoomed right back, it’s easy to see where new categories start.
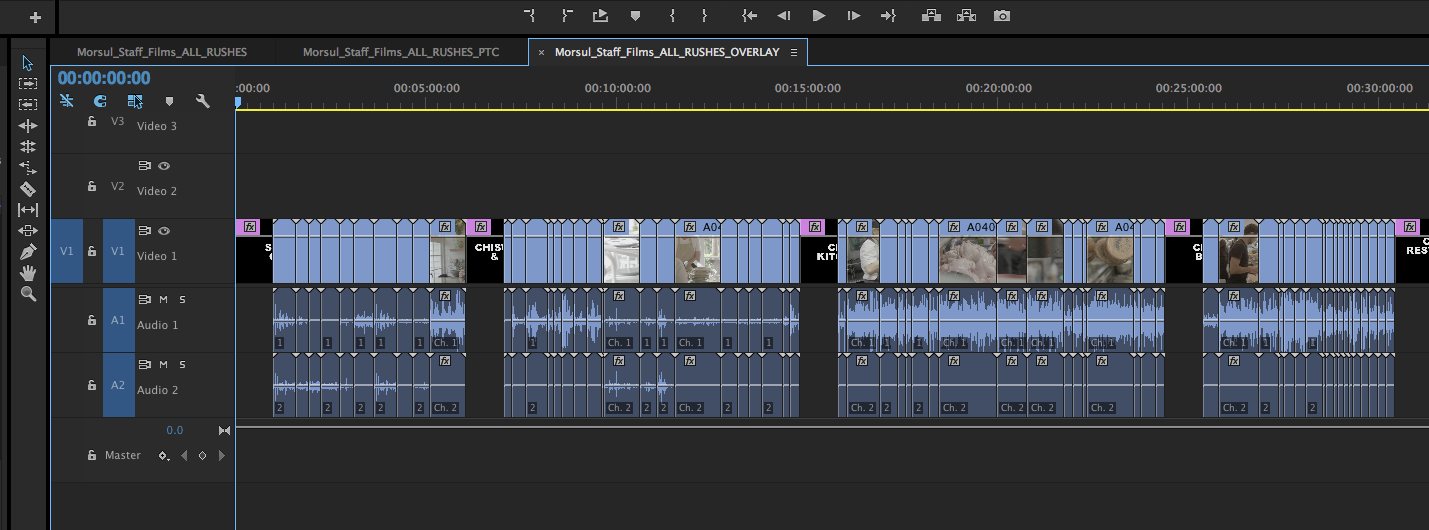
This is the timeline zoomed in a little more to show the organisation of the selects into categories.
6. Now it is time to start going into ASSEMBLY phase. Assembly editing is more about laying out all of your ingredients before you start cooking. Duplicate Project_Name_All_Interviews_Questions_Collated and start a new bin called EDITS. I always put my assembly edit into the Edit bin, as this will be the embryonic stage of the edit. If you find in later iterations of your edit that you want to go back and change direction a little, the ASSEMBLY edit will contain all of the selected material in an organized fashion and will be the easiest place to mine for new gold. Rename this sequence Project_Name_ASSEMBLY. Start re-ordering this sequence into something that has a structure. Read the names of the questions and put them into an order that is a good starting point for the edit. Now delete the title cards. If the interviews were filmed correctly, the interviewees would have repeated the question in their answer. What you now have, out of hours of raw footage, is the base to begin your edit.
7. It’s time to start the real work of editing. Duplicate Project_Name_ASSEMBLY and rename it Project_Name_Edit_001. Watch the sequence in full. Start using your instincts and cutting out weak answers. Find the narrative, find the emotion. Never be afraid to duplicate and start new sequences. In fact, this is essential. Every time you start changing direction, make a new iteration of your edit. You must always be able to return to an old edit, to step back to where you were before if needed. By staying organized and gradually taming the mountain of raw footage, you can be confident that you have explored your rushes to their maximum potential. You can be confident that you can help your producer or director or client try new ideas because you will be able to find shots quickly and easily. You need to show that you are in control of your footage and not drowning in it.
In my opinion, everyone has an editors’ instinct. Our society is media savvy and visually literate. But if you are going to call yourself a professional editor and be paid professional editors rates, then you need to have more than creativity and instinct. You need to be able to control your project and be the keeper of all of the media and all of the assets. That’s what you’re being paid for.
Categories: Tutorials
